
If you are familiar with the viral hit videos from Boston Dynamics, then you know that robot dogs are quite possibly the most amazing (and most terrifying) things ever created.
These mechanical quadrupeds cant help but set the imagination alight with brilliant ideas of what the future holds. Many toy companies have attempted to create their own robotic pets, with varying degrees of success.
Enter Gelo. Gelo (pronounced Gee-lo) is a robotic canine that comes as one of the five starter designs in the Lego Mindstorms Robot Inventor kit. The robot incorporates 4 motors, the distance sensor and the light sensor into its build. To our knowledge, it is the first and only official Mindstorms robot to use mechanical legs for movement instead of wheels.
Gelo is truly a mechanical marvel and is wonderfully impressive to build and see in action. In this build & code, we will explore Gelo’s design, how it moves and look at how to write the code to make it all work.
The Design


Gelo uses a complicated 4 motor set up to walk. Each motor moves back and forth, pushing the attached legs in an elliptical motion, a little bit like the wheels on a steam train.
Gelo is capable of moving forwards, backwards and turning left and right on the spot. It isn’t the most mobile of the five robots in the package, but its certainly the most futuristic looking. The robot is also a little bit limited on features, when compared to the other bots in the set. This is just the price that needs to be paid for such a complicated movement system.
This model has the colour and light sensor and the distance sensor included in the original design. There are a few activities that come out of the box which use these functions, however there are many more possibilities that will no doubt be discovered and shared down the line.
The Code
In order to make this guide as thorough and simple as possible, code will be split into four different parts: Start up, Movement, Resting & Commands.
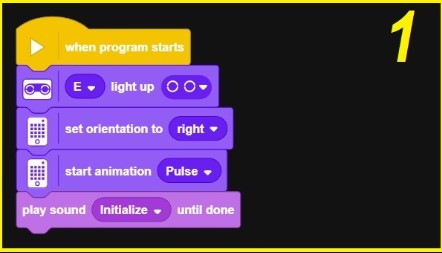
Start up: The first step is to establish a few basic commands for the intelligent hub to follow. These will affect the light on the distance sensor and the LED matrix, as well as playing a start-up sound.
All of these options are optional, but they bookend the program nicely. Start with a yellow ‘when program starts’ brick and add a distance sensor light up brick. Make sure the correct cable slot is selected for your build (ours in the example is slot E). Set the orientation of the intelligent brick to ‘right’ and start the ‘pulse’ animation.
Movement: Lego have created a robot brick pre-programmed to help with Gelo’s movement. This saves us a lot of work as there will be an awful lot going on behind the scenes with this one.
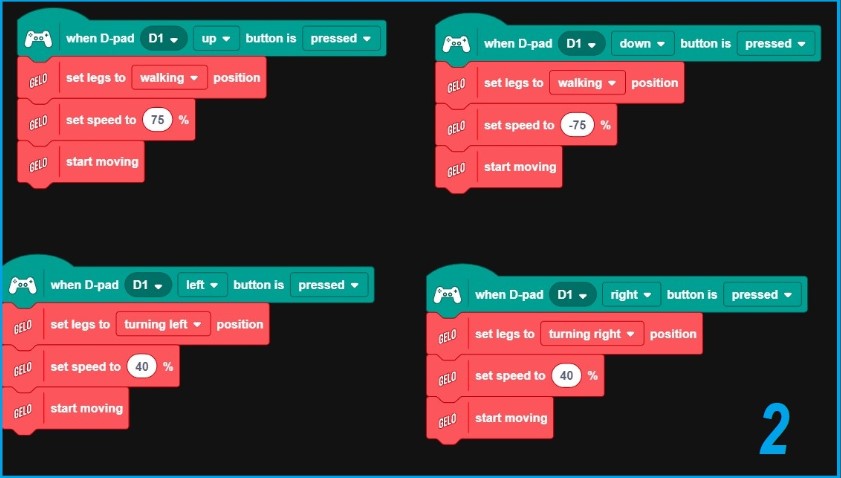
Set up four green remote control input blocks, one for each of the four main directional movements. Choose which input you would like to move Gelo (d-pad, analogue stick, on screen button, etc). For all four directions, add a ‘set legs to position’, ‘set speed to’ and ‘start moving’ block.
This is all you need for the movement. However, it will need to be fine tuned. Forwards and backwards movement should be set to a speed of 75% and -75% (remember that minus speed reverses the direction) and set the legs to ‘walking’ position, as shown in the example. For the left and right movement, set the speed to 40% for both sides. Set the legs to ‘turning left’ or ‘turning right’ position, depending on which button is being programmed.
Resting: Like with the previous models, Gelo also needs a line of code to tell the robot what to do when no commands are being given. This is a useful safety step for any robot, as it allows us to program the robot to stop if it loses contact with the remote control or if the user abruptly stops giving instructions.
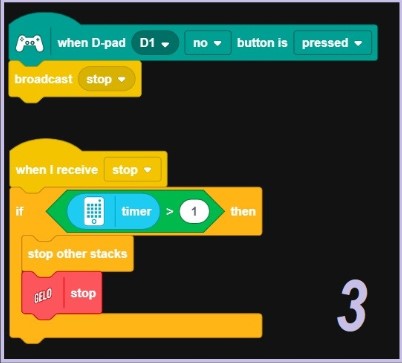
Add a final green remote control block and select ‘no’ from the drop down menu. This means that the code written below will only come into effect when no buttons are being pressed. Pick a yellow broadcast block and select ‘stop‘. This will tell the robot to broadcast a stop command when no buttons are being pressed.
This isn’t enough to work by itself though. Stop, just like any other word, is meaningless by itself when coding. Certain languages, like Python, do have some inbuilt command words, but usually we have to define what we want a word to do. We will do that now.
Add a yellow ‘when I receive’ block and select stop. This will now tell the robot what to do when ‘stop‘ is broadcast. We will then use a green operator block alongside a blue sensor block to create an ‘if‘ statement. If the timer is greater than one second, the program will stop all other stacks of code and tell Gelo to stop. Remember, this timer will only start if no button is being pressed.

Commands: As mentioned earlier, Gelo can be programmed to perform small tricks. There are two tricks that we will code in this example.
Both tricks start with a green remote control block, followed by a red ‘set legs to’ model block. Ensure you select two different buttons for the RC blocks, otherwise your commands will override one another.
From there, set the speed and movement accordingly. You could have a go at adjusting these settings later on to try and create new tricks for Gelo.
Conclusion
Once you have completed the coding, you should have a fully working robot. This is where the fun can begin. Test Gelo out and see if all of the functions work properly.
Once Gelo is fully operational, there are lots of different activities you can do to take the design further. Here are a few extension ideas you may wish to try:
- Program a new trick for Gelo to do.
- Adjust Gelo’s movement speed to make the robot run.
- Design a game for Gelo to play using the red Duplo ball.
Video Guide